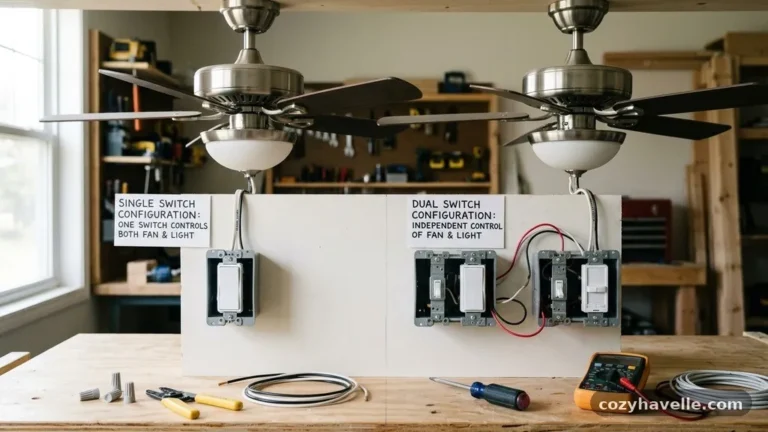

How to Install an Expanding Ceiling Fan Brace Bar Between Existing Joists
Installing an Expanding Ceiling Fan Brace Bar Between Existing Joists is the safest way to support a heavy fixture without tearing down your ceiling drywall. Standard electrical boxes are built to hold lightweight lights, but they will fail under the weight and constant motion of a rotating fan. By using an expanding bar, you bridge the gap between two structural members to create a rock-solid mounting point.
This project is manageable for most homeowners with basic tools and a clear understanding of electrical safety. Learning how to properly secure this hardware ensures your room stays quiet, stable, and compliant with modern building standards.
Safety First and Electrical Preparation

Before you touch a single wire, you must cut the power to the circuit. Go to your main electrical panel and flip the breaker that controls the light switch in the room where you are working.
Verify the power is off by using a non-contact voltage tester on the light switch or the existing fixture. Never assume the labeled breaker is the correct one; always test the wires directly once the old fixture is removed.
Working with electricity requires respect for NEC regulations, which dictate that fan-rated boxes must be used for all ceiling fan installations. Standard plastic boxes are not designed for the dynamic load of a fan and can crack over time.
When you remove the old box, inspect the opening. If you see signs of charring or melted insulation, stop and consult a licensed electrician before proceeding.
Tools Required for the Installation

Gathering your tools before you climb the ladder saves time and prevents unnecessary trips up and down. You will need a reliable stud finder to locate the ceiling joists, as these are the primary anchor points for your expanding brace. A high-quality drywall saw is essential for enlarging the hole if your current opening is too small for the new fan-rated box.
Keep a basic set of hand tools within arm’s reach to maintain efficiency. You will need a screwdriver, preferably with an insulated handle, and a pair of wire strippers for prepping the Romex cables. Having a drill with the correct drill bit size for the brace’s mounting screws helps create pilot holes, which prevents the wood from splitting when you drive the hardware home.
- Voltage tester for confirming power is off
- Stud finder to locate joists accurately
- Drywall saw for enlarging the ceiling opening
- Adjustable wrench or socket set for the torque nut
- Wire strippers and needle-nose pliers
- Safety goggles to protect eyes from falling debris
Locating Joists and Planning the Hole
Successful installation relies on finding the exact center point between your ceiling joists. Use your stud finder to map out the joist locations on both sides of the existing hole. Mark these positions clearly with a pencil so you know exactly where the expanding bar will bite into the wood.
If your current hole is too small, use a pencil to trace the outline of the new fan-rated box. Cut the drywall carefully, ensuring you do not nick any hidden electrical wires or plumbing lines running through the ceiling cavity. A clean, square opening makes the final installation of the ceiling canopy much easier and ensures a professional finish.
Assembling the Expanding Brace
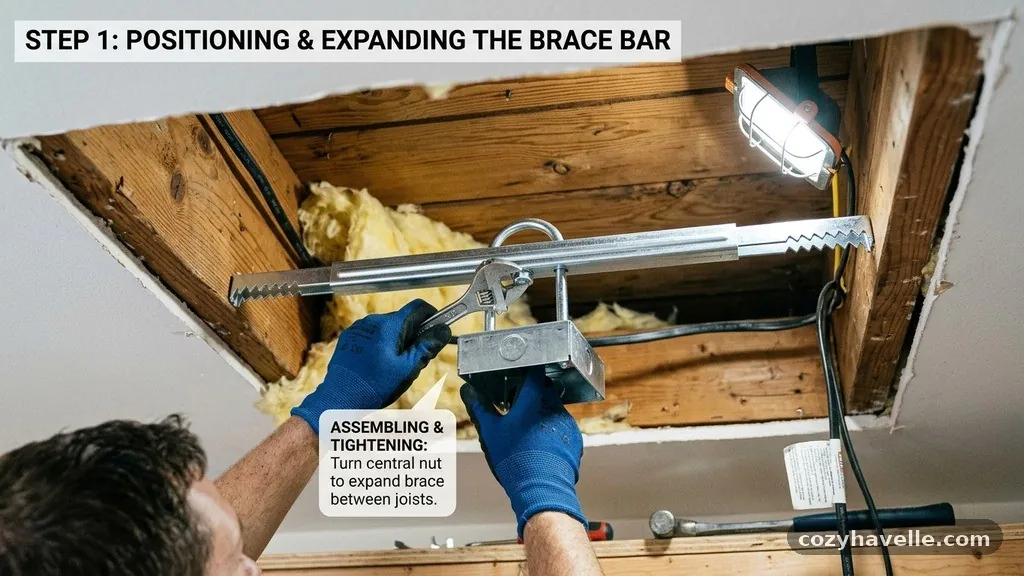
The beauty of an expanding brace is its ability to adjust to different joist spacings without custom framing. Most kits consist of a two-piece steel bar that telescopes to fit widths typically ranging from 16 to 24 inches. Start by placing the bar through the hole and orienting it so the teeth at the ends face the joists.
Twist the center of the bar to extend the arms until they make firm contact with the wooden joists. You want the teeth to bite slightly into the wood to prevent any lateral movement. Once the bar feels snug, use the provided wrench or pliers to tighten the torque nut, which locks the arms into their final, secure position.
Securing the Fan-Rated Box

Once the brace is locked against the joists, you must mount the electrical box to the bar. Slide the box onto the brace or bolt it directly to the center mounting plate, depending on your specific kit design. Ensure the box is centered within your hole so the ceiling canopy will hide the cut edges of the drywall.
Tighten the mounting bolts firmly to ensure the box does not shift when the fan is running. A loose box will cause annoying clicking sounds and eventually damage your ceiling finish. The box should be flush with the surface of the ceiling, or slightly recessed if your manufacturer’s instructions specify a particular depth for the mounting bracket.
Wiring the Fan Assembly
Pull the Romex cable through the clamp in the side of the junction box and tighten the cable connector to hold it in place. Strip about 3/4 inch of insulation from the ends of the wires using your wire strippers. Connect the black wire to the black fan wire, white to white, and green or bare copper to the grounding screw.
Use high-quality twist-on wire connectors to secure these joints, ensuring no bare copper is visible outside the connector. Pull gently on each wire to confirm the connection is tight. Tuck the wires neatly into the box, being careful not to overcrowd the space, as this can make it difficult to mount the ceiling canopy later.
Vibration Dampening and Final Mounting
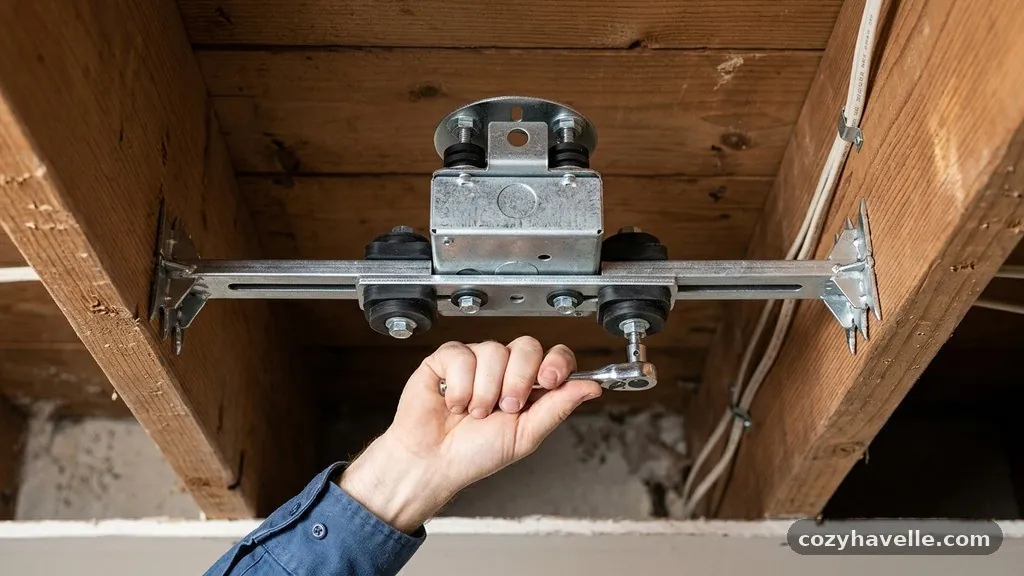
Ceiling fans naturally create micro-vibrations that can travel into the ceiling joists if not properly managed. Most modern kits include a rubber vibration isolation pad that sits between the fan bracket and the electrical box. Install this pad according to the manual to significantly reduce noise and prevent the fan from rattling against the ceiling.
Attach the mounting bracket to the junction box using the machine screws provided. Ensure the bracket is perfectly level before tightening the screws completely. If the bracket is crooked, your fan will wobble, which adds unnecessary stress to the structural integrity of the entire assembly.
Testing the Installation

Before hanging the heavy fan motor, verify that your work is solid. Give the electrical box a firm tug to ensure it is immovable. If the box wiggles or feels loose, you must go back and tighten the torque nut on the expanding brace until the assembly is rock-solid.
Check the wiring one last time to ensure no wires are pinched between the bracket and the box. Once you are satisfied with the mechanical stability, restore power at the breaker panel. Use your voltage tester on the wires inside the box one last time to ensure power is reaching the connection point as expected.
Common Mistakes to Avoid
Many DIYers fail because they skip the step of confirming the brace is properly locked. If the teeth don’t bite into the joists, the fan will eventually pull the bar downward. Always double-check that the torque nut is tightened to the manufacturer’s specified level, as this is the primary mechanism holding the assembly in place.
Another common error is using the wrong screws to attach the fan bracket. Never use drywall screws to hold the fan bracket to the box, as they are brittle and can snap under vibration. Always use the machine screws included with the fan-rated box, as they are designed to support heavy loads and resist fatigue.
| Component | Purpose | Installation Tip |
|---|---|---|
| Expanding Bar | Structural support | Tighten torque nut firmly |
| Fan-Rated Box | Electrical housing | Ensure it’s flush with ceiling |
| Vibration Pad | Noise reduction | Install between bracket and box |
| Grounding Screw | Electrical safety | Connect to green/bare wire |
Frequently Asked Questions
Do I really need a fan-rated box for a light-only install?
While not strictly required for a lightweight light fixture, it is highly recommended if you ever plan to swap that light for a ceiling fan in the future. Installing an expanding brace now saves you the effort of opening the ceiling a second time later.
Can I install this brace if I have recessed lighting in the way?
If recessed lighting is near your desired fan location, you may have limited space for the brace. You might need to move the light or choose a different mounting location to avoid clashing with the existing housing.
How do I know if my ceiling thickness will affect the box?
Standard drywall is 1/2 inch thick, but some older homes use 5/8 inch or even plaster and lath. Most fan-rated boxes have adjustable depth settings to accommodate these variations, so check your box’s manual for adjustment instructions.
What if the joists are spaced wider than 24 inches?
Standard expanding braces usually max out at 24 inches. If your joists are wider apart, you will need to install custom cross-blocking between the joists using 2×4 lumber instead of a pre-made expanding bar.
Is it possible to damage the ceiling finish during this process?
Yes, using a saw can chip paint or drywall paper. Use a sharp blade and light pressure, and consider using a trim ring or a larger ceiling canopy if you accidentally make the hole slightly too large.
Final Thoughts on Ceiling Fan Support
Successfully installing an Expanding Ceiling Fan Brace Bar Between Existing Joists is a rewarding task that improves both the comfort and the value of your home. By taking the time to secure the brace properly and ensuring all electrical connections are robust, you eliminate the risk of future wobbling or safety hazards. Remember that the structural integrity of your installation is only as good as the connection between the brace and the joists.
If you follow the steps outlined here and adhere to electrical best practices, your fan will run smoothly and silently for years. If you encounter any unexpected wiring configurations, don’t hesitate to reach out to a professional to ensure your home remains safe.